Wednesday, July 15, 2015

Saints Row's Deckers Cosplay post 1 of 2

Why hellllooooooo everyone.

It's been awhile since I posted and I am FINALLY getting around to writing the Deckers cosplay post. I am going to split up this post into 2 parts. This first post will focus on everything that is worn. The second post will only be about the Deckers' sword, the Nocturne.

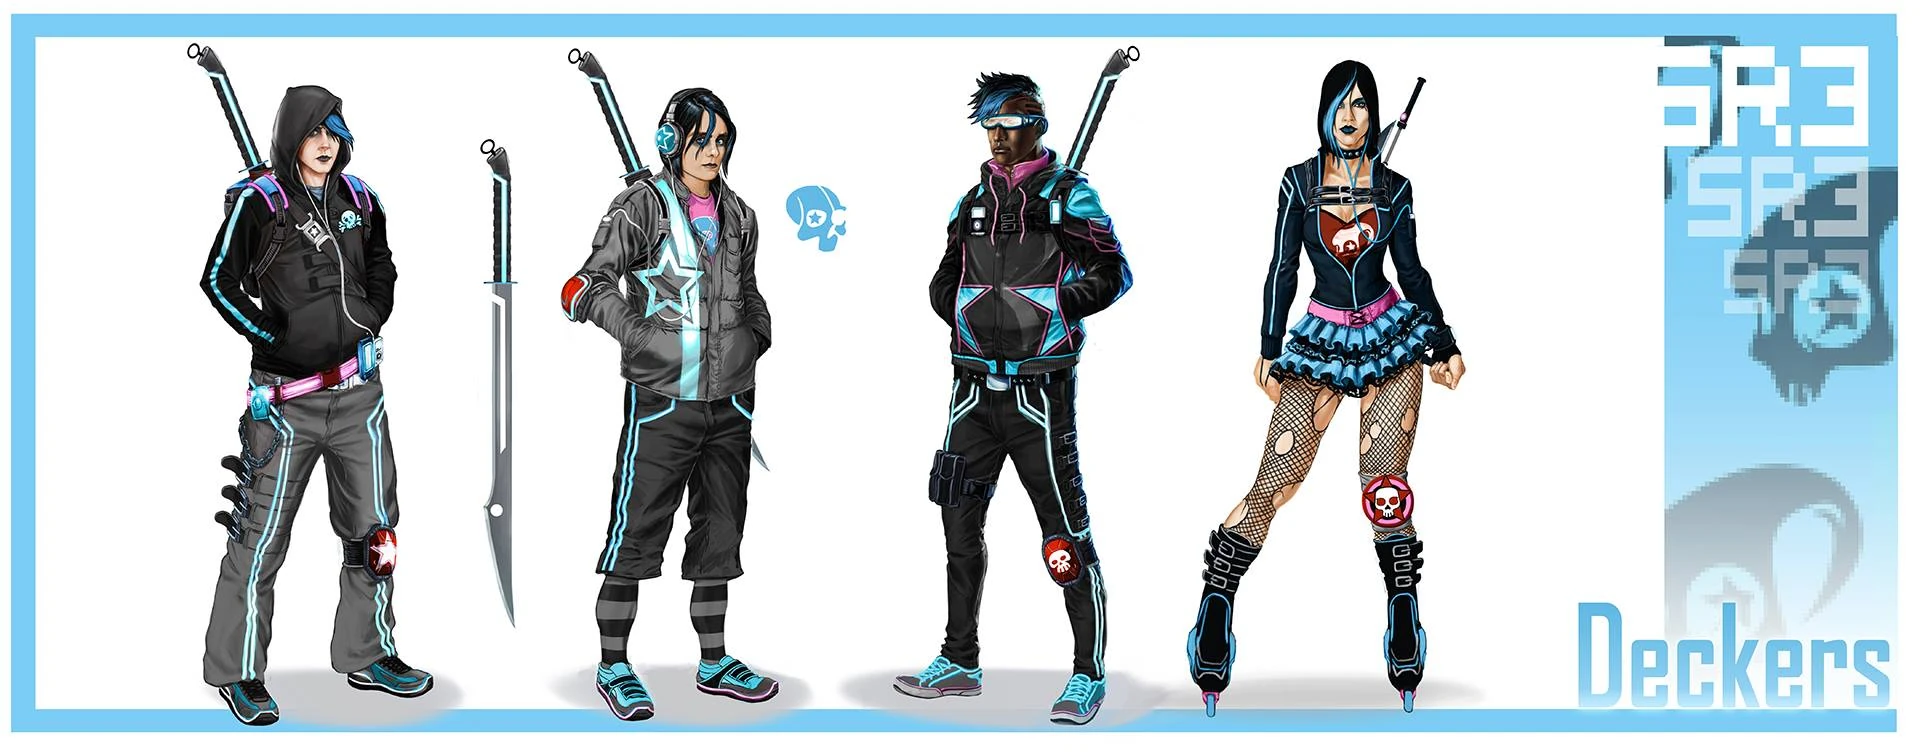
My Deckers costume didn't follow one particular Decker. I just mixed and matched what I liked from other Deckers and made it my own. I primarily used this picture as a reference point. After the mixing and the matching was done, this is how I looked.


I guess I'll go from top to bottom.
~Headphones~

The headphones I bought for super cheap on Amazon.


I took the headphones apart and sanded off all of the paint. Using Illustrator, I created a star to use as a stencil and traced the shape on to the headphones. After priming and tracing the star, I masked out the star shape.


When I repeated the previous steps on the other side, I used my Dremel and cut out the star.


Since the headphones are black, I simply spray painted them black. Since the characters are Deckers and they have stuff that lights up, I went ahead an put in a blue LED on both sides. In the picture below, you can already see some blue in the outline of the star. What that is is simply a blue transparent file folder that I bought at Office Depot. I cutted out the proper shape, hotglued that in and glued on the star.


Both LEDs simply run off some AA batteries that I keep in my hoodie pocket. The wires I wrapped in black electrical tape to make it look like it was just simply the headphone cord. I also added a simple little switch on the inside of where the speakers are to turn things on and off.


~Hoodie~

The black hoodie is just a plain old hoodie that I bought from Old Navy. The glowing blue star and stripe are all EL lights from adafruit.

If you want to know specifically what I bought, then here:
2 Aqua colored EL tape Link
1 Aqua colored EL panel Link

In case you are wondering, both EL products were not hard to use at all! It was as simple as connecting things to batteries and connecting wires. The EL panel did require a separate inverter but thats really it. If you have never messed with any EL stuff before, the inverters do give off a 'eeeeeeeeeeee' sound when they are on. You really wouldn't hear it unless you were in a silent room. Since I cosplayed with 3 of my other friends and all of us had multiple inverters on us, it was a bit louder and kinda amusing. :p

Attaching the EL tape and the EL panel to the hoodie was rather time consuming. I didn't mind the process, but thats cause I have a lot of patience. On the edges of both the EL tapes and EL panel is a 1/4" border of clear plastic that is not vital. So what I did was grab a hand-sewing needle and hammered in a bunch of holes all along the edges, as you can see below.
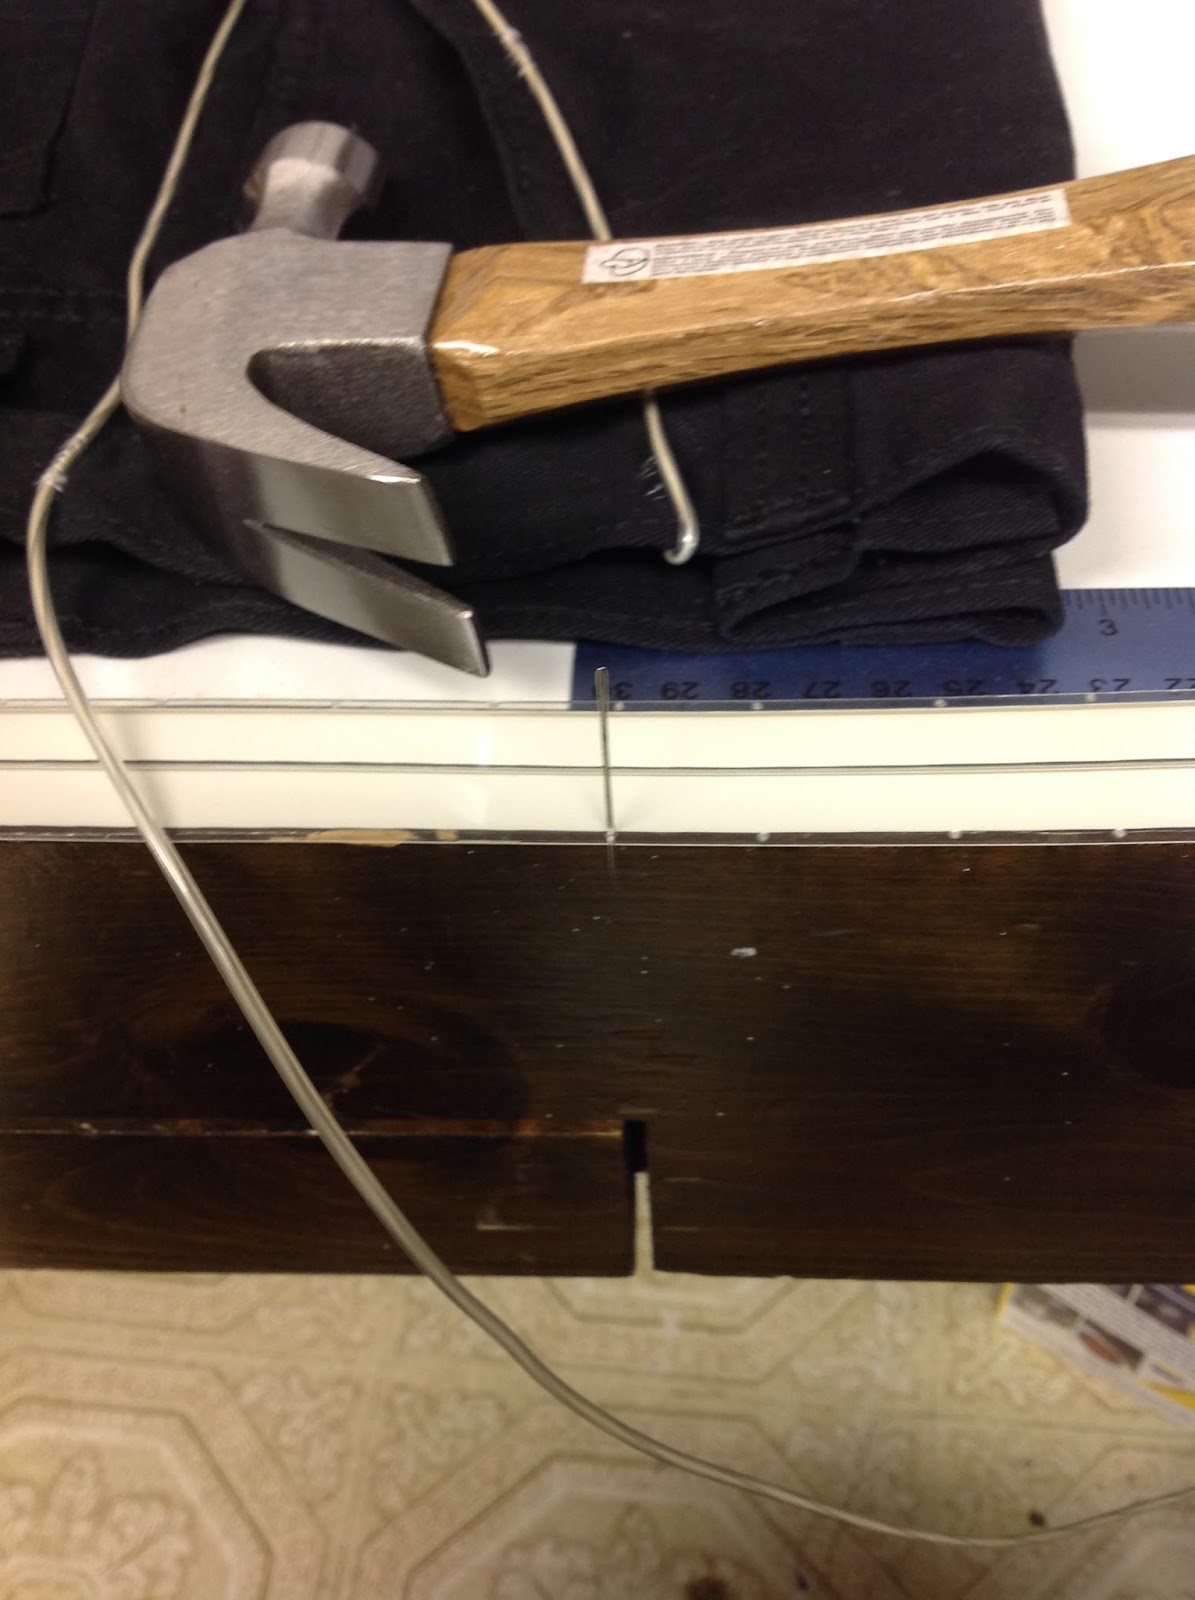

Why did I go that route you ask? Cause I found clear thread at Joann's and used that to hand-sewed both EL tapes and EL panel on to the hoodie. Did I mention that I'm a patient person??

What I used the EL panel for was the glowing star. It may look complicated, but trust me it wasn't. The great thing about the EL panel is you can actually cut the panel! As long as you do not cut off the connection to the panel, things will be fine. What I did was like the star on the headphones. Created and sized out a proper looking star in Illustrator and used that as a pattern on the EL panel. I took scissors to cut off what isn't needed and used black electrical tape to mask out the rest of the panel. The battery packs for the EL tapes and EL panel were in both pockets of the hoodie. Here's how it looked when finished.


~Shorts~

The shorts were simple enough, though I put in some unnecessary work. Bought a pair of cheap cargo pants and made them shorts........Yeah. I know. I didn't realize I could of just bought shorts instead of cutting pants into shorts until I was done. :p :p The glowing lines on the side of the shorts is just blue EL wire that is also from adafruit. Here. I also used the clear thread here to attach the EL wire to the shorts. I positioned the EL wire in a specific way to make sure I can put the battery pack into the pockets of the shorts.


~Shoes~

Lastly are the shoes. They are nothing special, cheap skater shoes from Target. I did buy some black laces to swap with the white laces that originally came on the shoes. The lights you see on the bottom of the shoes is an LED light strip from Amazon. Here. For the price, you would think they be extremely crappy, but actually no. The LEDs are nice and bright! I will say that the wire that runs from LED to LED is very thin! My friend also bought these to light up his shoes and his kept breaking but I didn't have that problem so if you do buy them, be cautious. I used clear silicone adhesive to attach the LED strip to the bottom of the shoes. As for the LED strip battery pack, I wrapped that in black electrical tape and put it in between the laces and the tongue of the shoe.


Thats basically it....I think. Theres so many pieces to this costume. I probably forgot a piece or two. If you want to see more Deckers pictures you can visit my friends cosplay website here and a gallery of a private photoshoot that we did here!

If you have any questions about how I made something, feel free to ask! This wraps the clothing side of the Deckers cosplay, next will be a post on the Deckers' sword, the Nocturne. I'm hoping that goes up fairly quickly.... Until my next post, HAPPY CRAFTING!!

Follow me on

Monday, September 29, 2014

The Wonderflex/ Worbla texture problem

Been awhile since my last post, been meaning to post somethings. Been really slacking. Maybe this post will help get things back on track. :p


Anyways, this post is about how to rid wonderflex and/or worbla of the bumpy texture. Everything reported in this blog post was all tested out by me and is not meant to be a end all be all solution. If you to find something better, then PLEASE do share it! The cosplay community is HUGE and always looking for new great techniques to make stuff, so please do give back!

The most popular ways of ridding wonderflex and/or worbla of the bumpy texture seems to be coating either material with layers upon endless layers of either gesso or a wood glue mixture or what have you. Yes those techniques do work, but they take waaay too much time! Application, drying time, application, drying time. x498,713,987. I know cause I've done that too. I'm not saying its wrong, but there has to be a better way, so, I experimented with 'Filler Primer'.

I'm not the first person to do this, but I do not see it posted really anywhere on the web. So here are my results:

Grabbed some scrap wonderflex and worbla. Made sure I had tests with curves and not just flat samples. There are 4 sets because I wanted to test the smooth side and the bumpy sides.


The 4 sets of samples with ONLY 3 coats of Filler Primer. Each coat applied when previous coat was dry to the touch. Around 20 mins or so.


This is how things looked like after using some 100 grit sandpaper and doing some light sanding.


Wonderflex                                                                         Worbla


Worbla                                                                         Wonderflex

As you can see from the pictures, Filler Primer does indeed work to fill in gaps. Of course you can spray on more coats as this will not take up a lot of time, but DO MAKE SURE you are aware of the temperature where you are. I think on the back of the can, it says for the best use is starting somewhere in the 50 degrees range, so treat it like if you were using spray paint. Too cold and you will just get cracks and what not.

If you made something with complex curves and something with a lot of details, then I will suggest using only the filler primer.

If you may have noticed, when using wonderflex for complex curves, the fabric grids tends to act like a fence, causing the plastic to bulge out. That will probably take a lot of layers of filler primer to fill but if its complex and hard to get to when sanding that might be the best option. Now if you do get bulging in bigger spaces, I recommend using 'Super Heavy Gesso'. It's basically a paste form of the thinner gesso you mostly see at craft stores. Super Heavy Gesso can be found at art supplies stores. I have not seen any sold at craft stores. I.E. Michaels, Joann's. If you do get some, I also suggest a palette knife for application. I would not use a brush as it makes application streaky and varies in thickness.

Palette Knifes
Super Heavy Gesso


Below are pictures of the Super Heavy Gesso with Filler Primer method. Piece is coated, waited for Gesso to dry, then sanded with 80 grit sandpaper. Super Heavy Gesso is flexible and has a somewhat rubbery feel to it, which is why the heavier grit sandpaper is needed. You do not need to apply a lot of pressure when sanding the Super Heavy Gesso and you do not need to get everything really smooth. The Filler Primer will take care of slight bumps and holes. Notice how things are not completely smooth and somewhat bumpy. NOTE: If there are any deep holes, fill them in. The Filler Primer does not spray on thick enough fill in deep holes.


Piece is sprayed with 3 coats of Filler Primer. Notice the difference in the bumpiness!


Took some 100 grit sandpaper and did some light sanding to smooth everything out. When Filler Primer is fully dried/ cured, it sands really well, so you do not need to sand with a lot of pressure. If you are not satisfied and still want things smoother, go ahead and spray on more coats of Filler Primer.


If prepping for spray painting, you can probably spray one more coat of Filler Primer then sand everything down with 150 grit sandpaper and proceed with the spray painting.

I find the above method so much faster than applying 9,871,231,234,987,351 layers of whatever just to get rid of the Wonderflex/ Worbla texture. One other tip you can use to help speed things up is to flip the Wonderflex and/or Worbla around and use the smooth side instead. It works even better!

I hope all this helps speed up your cosplay making timelines. Excuse the layout, I know its, bad. Until my next post, the Saint's Row Deckers Cosplay, Happy Crafting!

Follow me on

Wednesday, June 19, 2013

Quick update

Hello everyone,

Sorry for not updating since September of last year. :| Whoops. 

I promise I'll do a write up for the Unfinished Working Taokaka claws before the year is out. I'm still working on finishing up Aang's staff. :p I should have that finished sometime this year, as I hope to put it to use at Katsucon next year! I've already have plans for a Saint's Row costume for MAGfest and maybe even a Kellam costume for some con. I am also working on Ivy's whip sword from Soul Calibur for a friend.

Adam Savage said it best when he said that a deadline is a great motivator! Until then and for more frequent updates, check out my new tumblr page! http://monkimakr.tumblr.com/ I'll still be making posts here for finished projects! Late-tars.

Monday, September 10, 2012

The Wedding Present

I know I said that my next post will about the working Taokaka claws, but I haven't gotten around to putting all the pictures together. What I do have put together are pictures of a wedding present I made for two very good friends of mine who got married.

So both friends are avid fans of Zelda and are crafty so it only be fitting that their present be of both worlds.

I don't know what the official name is of this thing I made but it is 8-bit magnets from the first Zelda on the NES put on to a metal whiteboard.

To start off with the project (sorry for not having any screenshots of the process written below), I started up Zelda and took screenshots of the game. With the all the screenshots, shot, I didn't want to just cut out pieces of the screenshots and just use that. I wanted hi-res images for printing, even though its supposed to be 8-bit, pixelated art. :p So all the squares that were printed, I re-created in Photoshop, 1024x1024. In Photoshop, I just created a 64x64 pixel pencil brush and went to the screenshots to eyedrop for the proper colors. I laid out a grid on the screenshots and on the blank canvas and recreated everything by just counting how many squares I had to paint in. Everything else was just me sitting down and cranking everything out in the same fashion.

When I finally finished re-creating everything, I re-sized all the squares to 1" x 1" and laid everything out to fit a 8.5x11 sized paper. The squares weren't printed on just regular sheets of paper, they were printed on 8.5x11 sticker sheets of paper that can be bought at any Office Depot. In fact they are Avery Labels 3383. When printed, they look like this: (Oh, I forgot to mention that I sprayed the printed sticker pages with fixative so there wouldn't be any fading.)


As for the magnet part, I found some 5" x 8" magnet sheets with sticky back from Michael's for about $2.50 a sheet.


I cut the printed sticker sheets in half and stuck them to the magnet sheets so that the two printed 8-bit squares fit on 4 magnet sheets.


When the time came to cutting everything, I didn't use scissors. I cut everything with a utility blade.


Looking back now, I think it could have been a better idea to use scissors instead, but I think a blade gave me a better edge and a better cut. Oh well, it turned out good. :p


Since I work next to a Container Store and they sell metal white boards, I bought one from there for about $30, I think, and just put all the magnets on there. Here's how it looks like when done:


Whats pictured in the picture wasn't how I laid everything out. Since I forgot to take a picture of everything before I wrapped it up, I had to take a picture of it when I saw it later and it was already played with, but you get the idea. :) And, thats, that, actually. So if you want to make a set of your own, its really not that expensive, especially if your gonna use your refrigerator as your 'white board'.

So my next post will be the WIP working Taokaka claws that I hope I'm given a chance to get another crack at and it should be up before the year is out, so do tune in later for that if your interested. If you have any questions, feel free to ask! ENJOY!

Follow me on

Thursday, May 17, 2012

Xbox 360 Arcade Stick mod

Haven't updated this in awhile. Looks like the last post was around September. Whoops. :p So here's something I've recently modded.

I wanted an arcade stick for my future 360 to play the sillyness that is Cave's bullet hell shooters. Looked around on the web and they're pretty expensive, but I found a used Street Fighter one on Craigslist for $80 and just got that instead.


I didn't like the art and wanted one with custom art, so I went at it.

I unscrewed the back panel and took a picture of the wires to help me with what wires go where when I but everything back together.


The panel that has the buttons and the joystick on it is metal and the Street Fighter art thats on the metal panel is one big vinyl sticker. I removed the vinyl sticker and washed the surface down with soap and water to clean and removing and oils from the surface. When dried, I sprayed the panel a couple of times with primer then laid down a couple of layers of white paint.


I took some 220 grit sandpaper to the buttons and the joystick ball to remove the gloss coat.


After priming the buttons and the joystick ball, I put down two coats of this. :)


Yes, you see that correctly. Its spray glow-in-the-dark paint!! I found it at a Micheal's on sale. :) :)


After laying on two coats of glow-in-the-dark paint, I sealed it with clear coat, which didn't hinder the glow-in-the-darkyness. There was one button that was stubborn and the glow-in-the-dark paint kept splitting apart. I think some moisture got in somewhere and caused the splitage. Because of the new layers of paint and clear coat, it caused the buttons to scrap the sides of the button housing and the button did not pop back up. With a exacto knife I scraped down the sides of the button housing to make it bigger. All in all, I am quite pleased at how it came out. I was surprised that the switches in the buttons weren't like the switches in arcade cabinets but that makes sense since thats a lot bigger.


Took a pencil and drew on the art to the white control panel, then colored everything in with prismacolors and other markers. After I let it dry for a bit, I then sprayed two coats of clear on to seal everything in.


Put everything back together and this is the final product. :p


Picture of the glow-in-the-darkiness. This picture is the best I can do with it being dark and all, sorry.


I'm not really all that satisfied with the art, but it will have to do for now. Down the road I'm gonna properly scan in the monkey artwork, color it in photoshop and see if I can get it printed on vinyl as a decal.


Update on papercraft Link: Completed Link's tunic and chest belt. I am putting papercraft Link on hold right now to focus on a different build and will update this blog later on.


Next Blog post: Working (unfinished) retractable Taokaka claws.


See you next time!


Follow me on